How to Install a Kitchen - Step by Step Guide
Welcome to our comprehensive guide on how to install a kitchen.
Whether you're embarking on an ambitious DIY project or simply want to understand what's involved, we've composed this step-by-step manual with you in mind.
Drawing upon our 25 years of experience and having sold tens of thousands of kitchens, we bring a wealth of knowledge and expertise to offer invaluable advice. It's no small undertaking, indeed.
Note: This guide gives an overview of the whole process, it assumes you have some basic understanding of DIY tasks, but even if you're an absolute beginner, don't worry, we're here to help!
Remember, you can always hire a professional for more complex tasks while tackling the simpler ones yourself - it's all about learning. It's important to stay safe and feel confident in the tasks you are completing.
Our guide is segmented into key sections to ease your navigation and help you find information quickly.
Here is what we'll be going through, step by step:
- Planning and Designing Your Kitchen Layout*
- Gathering the Necessary Tools and Materials*
- Preparing the Workspace*
- Demolishing and Removing the Old Kitchen*
- Installing the Kitchen Cabinets
- Measuring and Installing Worktops
- Installing the Sink and Tap
- Installing and Connecting Appliances
- Electrical and Plumbing Considerations
- Installing Backsplash and Wall Tiles
- Installing Kitchen Flooring
- Adding Finishing Touches, Lighting and Décor
- Common Mistakes to Avoid
- Budgeting and Cost Considerations
- Safety Tips and Precautions
- Glossary of Kitchen Terms
- Your Next Steps in the Kitchen Installation
Each section will provide detailed, easy to understand overview and links to more detailed instructions.
If you don't understand a term or a concept, don't panic - we've included a glossary with common kitchen installation terms and their definitions.
Now, let's start your kitchen installation journey!
1. Planning and Designing Your Kitchen Layout
Before you begin the nuts and bolts of kitting out your kitchen, the first step involves the all-important facet of planning and designing your layout.
This process is crucial to ensure that space is optimised and that your kitchen is both functional and aesthetically pleasing. It's like designing a blueprint for your project that will guide your actions in later stages.
In the design phase, you'll need to consider several factors, from the size and shape of your kitchen to your storage needs, work habits, and lifestyle.
This is an exciting stage where you can let your creativity flourish while keeping practicality at heart.
Key considerations during Planning and Design
- Space utilisation: Consider how to best utilise the available space. Think about the 'working triangle' - the optimum position of the hob, sink and fridge.
- Storage: Storage is king in kitchen design. Plan for ample cupboard and drawer space, and consider installing wall units or overhead cabinets.
- Appliance Placement: Where you place your appliances can have a significant impact on workflow and functionality. Balance between usage and appearance.
- Lighting: Good lighting is crucial in a kitchen. Incorporate layered lighting with a mix of ambient, task, and accent lighting.
- Style and Finish: This is where your personal taste comes into play. Consider the style and finish that complements your home décor.
Design and Planning Tools
- Downloadable Planning Guide: An essential resource for all stages of the process, ensuring you don’t lose track.
- 3D Online Kitchen Planner: You'll love the Better Kitchens online planner tool. This handy utility provides a convenient, time-saving way to visualise and create your perfect kitchen layout.
- Full showroom facilities: Visit us in person to explore all the options, materials, and designs on offer.
- Our helpful team: Need a guiding hand? Our experienced team is always ready to provide friendly assistance and advice.
The above considerations should serve as a solid start point, the more careful thought you put into this stage, the smoother the rest of the installation will go.
2. Essential Tools and Fixing Materials for the Install
Before proceeding to install your kitchen, it's essential to gather all the necessary tools and materials.
Having everything at hand will ensure a smooth, seamless, and efficient project, ultimately saving you time and potential frustration.
From measuring tapes to power drills, your toolkit should be well-equipped and ready for various tasks.
Likewise, the right materials are a must, whether it's the flat-pack cabinets or the fittings, ensure they align with your project requirements and your vision for your kitchen.
Here's What You'll Need:
When preparing for a kitchen installation, it's important to equip yourself with all necessary tools that will facilitate a smooth and efficient process.
We've compiled the following list of tools commonly used in kitchen installations. This isn't by any means an exhaustive checklist, but it covers the basics you're likely to need.
Hand Tools
- Set of screwdrivers: Possess a variety of sizes and types, both flat-headed and Phillips.
- Hand saw: Ideal for making quick cuts or adjustments to kitchen structures if needed. Ensure your blades are sharp.
- Tape measure: Precision is vital in kitchen installation. Accurate measurements are key so that every part fits just right.
- Pencil: For marking any measurements or outlines directly onto your kitchen structures.
- Set of spirit levels: It is crucial to ensure everything is perfectly aligned from cabinets to appliances.
- Masking tape: Useful for marking areas without leaving residual marks or damaging surfaces.
- Hammer: Whether you're doing work such as knocking in levelling shims, removing old fixings, or any tasks that require some force, a trusty hammer is undeniably essential.
- Clamps: These will hold elements stable while you work, enhancing safety and precision.
Power Tools
- Cordless drill and impact driver: These are inevitable for attaching parts such as cabinets and handles.
- SDS drill: An ideal tool for drilling into walls, especially if you are installing heavy objects.
- Jig saw (with downward cutting jigsaw blades): Extremely practical for cutting out more complex shapes or sections of your kitchen.
- Circular saw: Ideal for making straight cuts in a variety of materials.
- Router and worktop jig: These are used for perfecting the edges and joins on your worktops.
- Laser level (optional): While a spirit level achieves great results, a laser level can further streamline the process for detailed installation.
Fixing Materials
- Wood screws: These are essential for attaching the kitchen cabinets to the wall.
- Bolts and washers: Ideal for a secure hold, especially when installing heavy objects.
- Adhesives: A strong adhesive is necessary for sticking parts together, such as countertops or back plashes.
- Nails: Useful for securing loose or small pieces, like moulding or trim.
- Wall Plugs and anchors: These are used for adding extra security when fixing cabinets onto walls.
- Silicone sealant: Needed for sealing gaps around sinks and backsplashes to prevent water leakage.
- Wedge spacers: Utilised to evenly space out tiles during wall tile installation.
In Depth Reading: Essential Tools and Fixings for a Kitchen Installation
3. Preparing the Workspace
Before any process of installing a new kitchen begins, it's absolutely crucial to prepare your workspace.
Doing so ensures the safety of everyone involved and makes for a more efficient working environment. Let's walk you through some key steps to make this area as conducive as possible.
Clear and Empty Your Kitchen
Before we dive into the heart of your kitchen installation, let's talk about the initial step which is an all-important clear-out.
Remove everything from your kitchen. Decluttering is key here - from small gadgets and food items, to large appliances.
If you're planning on reusing some appliances, make sure to safely disconnect them and move them to another place.
By doing this, you ensure the entire space can be worked with easily, providing an uninterrupted platform for the forthcoming steps of your kitchen installation.
Getting Ready to Remove the Old Kitchen Cabinets
Removing old kitchen units is a major part of getting your kitchen installation-ready.
Experienced kitchen installers handle kitchen installation tasks with relative ease, and so can you.
With the right tools, such as hammers and crowbars, they have an impressive ability to dismantle an old kitchen in a flash.
Though this might result in a bit of a mess initially, it's actually the fastest and most cost-effective strategy.
However, if you plan to repurpose these old units, possibly in the garage or a utility room, then a more careful approach is needed. This means exercising caution to conserve the units during the removal process.
It could be a bit more time-consuming, but absolutely worth it if you're looking to save these units for future use.
Maintain a Safe Working Environment
With an empty space now, ensure that there are no obstructions that could pose potential hazards. Check for protruding nails or any sharp edges on walls or floors.
Clear away any dust or loose particles that could be a slipping risk. A clean, hazard-free workspace is a safer one.
Plan for Dust and Debris
Installing a new kitchen generates plenty of dust and grimy debris. You can manage this by placing dust sheets over any remaining furniture you have in adjacent rooms and sealing the kitchen doorways.
Also, remember to keep a vacuum handy. Regularly clearing the dust ensures a cleaner working space and less of a clean-up task at the end.
Prepare a Tool Station
Lastly, you need your tools to be within reach and well-arranged. Create a dedicated area in your workspace where you can place your tools and equipment systematically.
This minimises the chances of misplacing them and also helps speed up work as you won't waste time hunting around for what you need.
In summary, a well-prepared workspace is guaranteed to make the kitchen installation process smoother and safer.
While it might feel like extra work at the start, you'll reap the benefits as your project progresses.
4. Demolishing and Removing the Old Kitchen
When the old kitchen needs to make way for the new, the first step is demolition (See above).
This critical undertaking, often overlooked in the excitement of dream designs and shiny new appliances, can be quite the challenge.
However, with the appropriate preparation and care, it can be accomplished effectively, allowing for a smooth transition to your new kitchen setup.
As you gear up to dismantle the old kitchen layout, it is important to keep several factors in mind.
From safety precautions to ensuring minimal disruption to your daily routine, here are some useful tips for kitchen removal:
Plan Your Meals:
Before you commence with the kitchen removal, it's key to have a plan in place for meals during the install phase. If you can afford to, ordering takeaways or planning to eat out for a bit is a decent option.
However, if you prefer home-cooked meals, consider setting up a temporary kitchen elsewhere in the house.
This could simply feature a small table with a hotplate and a mini-fridge; just enough to cater for simple meals.
Safety First
Always wear sturdy work boots and gloves to avoid injury during the process.
If you are removing cabinets or other structural elements, make sure to have supports in place.
Eco-Friendly Disposal
Don't just throw out the old kitchen materials. If parts can be salvaged, consider donating or selling them.
Alternatively, check for local recycling centres where you can dispose of the material in an eco-friendly manner.
Documentation
Always document the original condition of the space and the process of kitchen removal. This can serve as a reference if any disputes arise if dealing with a landlord or property manager.
Remember: Good planning and patience during the kitchen removal process will make the installation phase more manageable and potentially less stressful.
Lastly, be prepared for hiccups. Even with a well-thought-out plan, surprises can spring up. Perhaps some wiring isn't as expected, or the plumbing is more complex than anticipated.
Keep a cool head and approach these challenges methodically, knowing that you're on your way to your dream kitchen.
5. Installing the Kitchen Cabinets
Let's dive straight into the wealth of knowledge we have available for you on installing kitchen cabinets.
Each of these links will guide you to detailed articles providing step-by-step guidance on each aspect of kitchen cabinet installation.
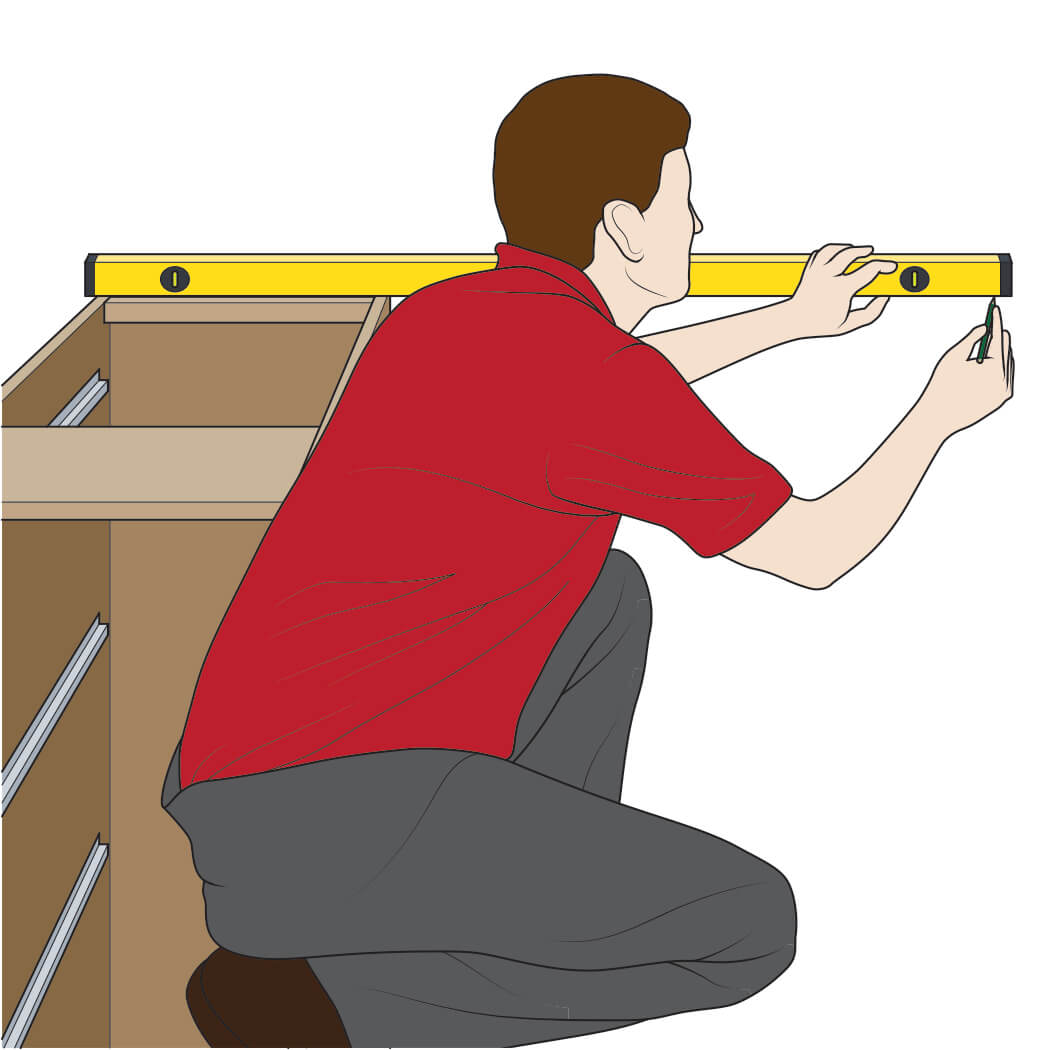
(5.a) Kitchen Base Units
To start with, the installation of kitchen begins with base units. These are the cupboards and drawers that rest on the floor.
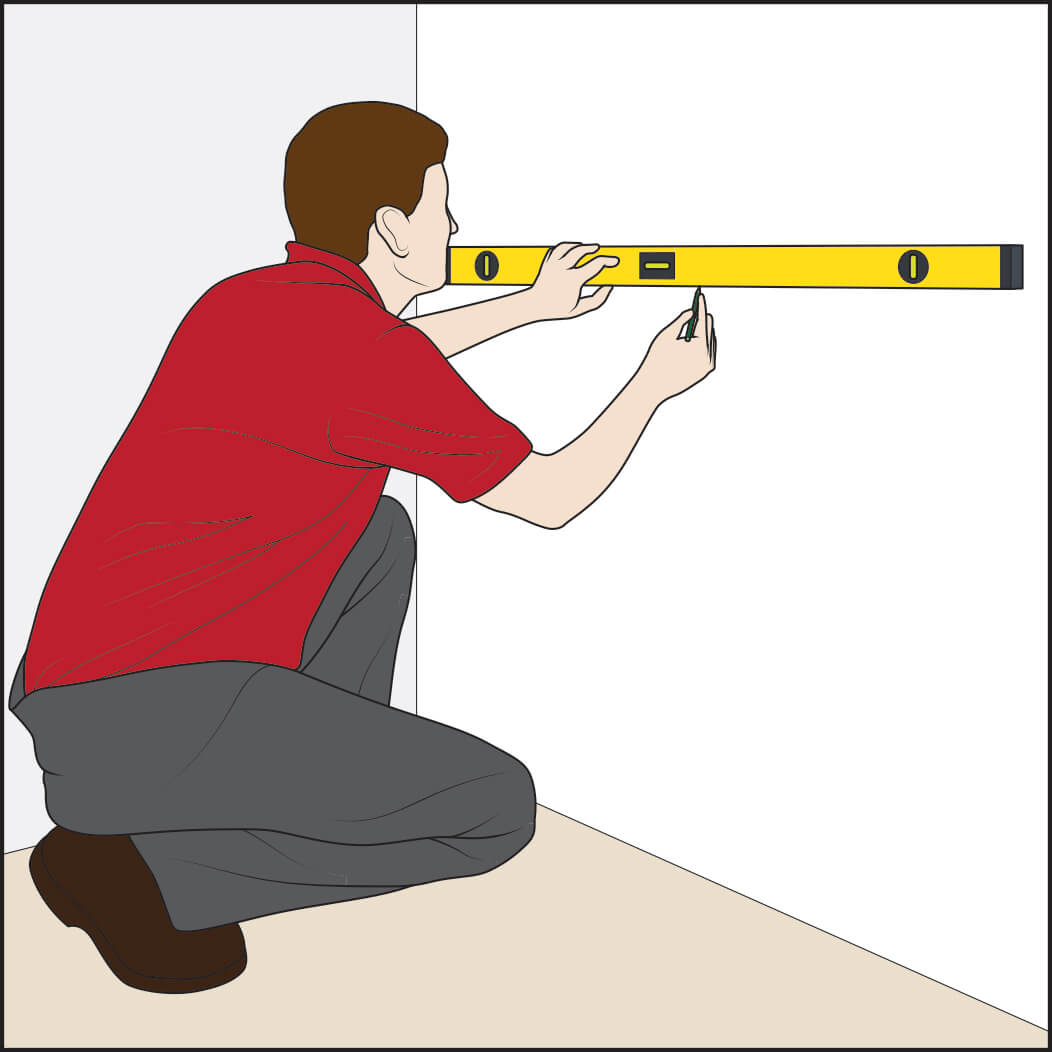
It's of paramount importance to ensure your base units are level as they form the foundation for the rest of the kitchen.
See how to How to Level a single kitchen base unit & How to level a group of kitchen base units
For detailed instructions on these processes, you can refer to following guides:
- Installing Standard Base Units - This guide provides detailed steps on how to level and firmly secure the base units of your kitchen. This includes Highline and Drawerline units.
- Installing Drawer Base Units - Comprehensive manual on fixing cupboards to the walls, ensuring they are level and stable. See How to remove kitchen drawers from the unit
- Installing a Single Oven Housing Base Unit - Learn how to precisely fix the drawers, ensuring they slide in and out smoothly and are securely attached to the base units.
- Installing a Feature End Base Unit - Including Open end units, curved ends and wine racks.
Remember, ensuring everything is level is key, as anything that’s off could affect the overall appearance and functionality of your kitchen.
(5.b) Sink Base Units
Corner units, sometimes referred to as carousel units, can optimise the use of space in your kitchen. They require accurate measurements to fit perfectly without breaking stride of the kitchen design.
Additional resources can be of huge benefit to you, especially if you're planning a DIY installation of kitchen corner units.
They provide a more in-depth guide on key topics related to the installation process. Here are some you might find useful:
(5.b) Oven Base Units
Corner units, sometimes referred to as carousel units, can optimise the use of space in your kitchen. They require accurate measurements to fit perfectly without breaking stride of the kitchen design.
Additional resources can be of huge benefit to you, especially if you're planning a DIY installation of kitchen corner units.
They provide a more in-depth guide on key topics related to the installation process. Here are some you might find useful:
-
Installing a Single Oven Housing Base Unit - Learn how to precisely fix the drawers, ensuring they slide in and out smoothly and are securely attached to the base units.
- Installing a Built-Under Double Oven - Learn how to precisely fix the drawers, ensuring they slide in and out smoothly and are securely attached to the base units.
(5.b) Built-Under Appliances
Corner units, sometimes referred to as carousel units, can optimise the use of space in your kitchen. They require accurate measurements to fit perfectly without breaking stride of the kitchen design.
Additional resources can be of huge benefit to you, especially if you're planning a DIY installation of kitchen corner units.
They provide a more in-depth guide on key topics related to the installation process. Here are some you might find useful:
-
Installing a Integrated Dishwasher - Learn how to precisely fix the drawers, ensuring they slide in and out smoothly and are securely attached to the base units.
- Installing an Integrated Built-Under Fridge or Freezer - Learn how to precisely fix the drawers, ensuring they slide in and out smoothly and are securely attached to the base units
- Installing an Integrated Washing Machine or Tumble Dryer - Learn how to precisely fix the drawers, ensuring they slide in and out smoothly and are securely attached to the base units.
(5.b) Free Standing Appliances
Corner units, sometimes referred to as carousel units, can optimise the use of space in your kitchen. They require accurate measurements to fit perfectly without breaking stride of the kitchen design.
Additional resources can be of huge benefit to you, especially if you're planning a DIY installation of kitchen corner units.
They provide a more in-depth guide on key topics related to the installation process. Here are some you might find useful:
-
Installing Freestanding Appliances Under Worktops - Cover Dishwashers, Washing Machines, Tumble and Wine coolers.
- Installing Freestanding Ovens & Range Cookers - Learn how to precisely fix the drawers, ensuring they slide in and out smoothly and are securely attached to the base units
- Building in Freestanding Appliances - Understanding the challenges of this!
(5.b) Corner Units
Corner units, sometimes referred to as carousel units, can optimise the use of space in your kitchen. They require accurate measurements to fit perfectly without breaking stride of the kitchen design.
Additional resources can be of huge benefit to you, especially if you're planning a DIY installation of kitchen corner units.
They provide a more in-depth guide on key topics related to the installation process. Here are some you might find useful:
- Measuring Guide for Kitchen Corner Units
- Installation Instructions for Carousel Units
- Troubleshooting Tips for Corner Unit Installation
- How to optimise space with Corner Units
- Design Tips for a Smooth Kitchen Layout with Corner Units
These links provide a more detailed guide for the installation. So, don't hesitate to check them out if you encounter any issues during your installation process.
(5.c) Tall Units
Tall units are often utilised for housing appliances or acting as a pantry. These need to be fit into place securely, taking into account the additional weight they may need to bear.
Tall units are essential components of a kitchen, serving multiple uses such as housing appliances or working as a pantry.
Thus, it is very important these units are installed securely, considering the additional weight they might have to endure.
For an in-depth guide on the installation of tall units, you can refer to the following pages:
- Installing Standard Tall Units - This guide covers the installation of standard tall units, taking you through the process in an easy-to-follow, step-by-step manner.
- Installing Tall Units with Appliances - This guide provides detailed instructions on how to safely install tall units that will house appliances.
- Installing Tall Pantry Units - Follow this guide to confidently install pantry units, to ensure optimal storage for your food items.
Always remember, the success of any DIY project lies in careful preparation and not rushing the process. Happy DIYing!
(5.d) Wall Units
Wall units are a great way to increase storage space in the kitchen. They should be mounted securely and at the correct height for easy accessibility.
Here is a list of useful links that provide more in-depth knowledge for the correct installation of your wall units. We recommend thoroughly reading through each guide
Wall units prior are to starting a significant your element of a project kitchen to's design ensure a and smooth functionality and safe.
They installation provide process additional storage. and can aesthetically pull the room together. However, the installation process requires careful attention.
It's essential to securely mount them and adjust the height for easy access. Below you'll find a list of links to more detailed guides to assist you in this process:
- Correct Installation of Wall Units: This guide discusses a step-by-step process of installing Wall Units correctly.
- Determining the Right Height for Wall Units: To make your kitchen both functional and comfortable, deciding the appropriate height for Wall Units is crucial. This guide focuses on how to judge that.
- Securing Kitchen Wall Units Safely: Once your wall units are set up, ensuring they are secure on the wall is a key step. This guide provides safety tips to consider.
Remember, each kitchen and person's requirements may vary, so tailor these guidelines to suit your needs for optimal results.
(5.e). Islands and Peninsulars
Kitchen islands and peninsulars are standalone entities with storage and sometimes seating. They require careful planning to ensure an effective workflow around them.
Kitchen islands and peninsulars are standalone entities with storage and sometimes seating.
They require careful planning to ensure an effective workflow around them.
For more detailed information on several aspects of the installation, consider checking out the following articles:
- Installing Kitchen Islands: Complete Guide
- Planning Perfect Kitchen Peninsulars
- Ensuring Effective Workflow in Your Kitchen
- The Importance of Space Planning in Kitchen
- How to Incorporate Seating in Kitchen Island and Peninsular
- Understanding Storage Options for Kitchen Islands and Peninsulars
(5.f) Fitting End Panels
End panels are used to give your kitchen a neat and clean finish.
They cover the exposed sides of cabinets, providing a sleek and professional appearance to the overall design.
To ensure you get the best result with your end panels, take a look at some of our more detailed guides for specific steps in the process.
Each guide provides detailed, step-by-step instructions making the process easy to comprehend and execute:
- Choosing the right end panels for your kitchen
- Measuring your cabinets for end panel installation
- Cutting the end panels to size
- Attaching end panels to your cabinets
- The final touches: sealing and painting your end panels
(5.g) Fitting Plinths
The plinth or kickboard, is the panel that covers the space between the base unit and the floor. Fitting them correctly ensures no gaps are left open for pests to find their way into your kitchen.
The plinth or kickboard, is the panel that covers the space between the base unit and the floor. Fitting them correctly ensures no gaps are left open for pests to find their way into your kitchen.
For more detailed information on the installation process, you may wish to check out the following guides:
- Fitting Plinths Correctly: A Practical Guide
- Avoiding Gaps During Installation: Tips & Tricks
- Identifying Possible Pest Entry Points in Your Kitchen
(5.h) Fitting Cornice
The cornice is the decorative moulding for the tops of cabinets, while the pelmet is for the bottom.
These not only add aesthetic value but also help cover any gaps or uneven edges from installation.
For more detailed installation processes, you might find the following links helpful:
- Installing a Kitchen Cornice
- Fitting a Kitchen Pelmet
- Covers small installation gaps effectively with Mouldings
- Ways to Enhance the Aesthetic Value of Your Kitchen
(5.i) Fitting Pelmet
The cornice is the decorative moulding for the tops of cabinets, while the pelmet is for the bottom.
These not only add aesthetic value but also help cover any gaps or uneven edges from installation.
For more detailed installation processes, you might find the following links helpful:
- Installing a Kitchen Cornice
- Fitting a Kitchen Pelmet
- Covers small installation gaps effectively with Mouldings
- Ways to Enhance the Aesthetic Value of Your Kitchen
(5.j) Cabinet and Kitchen Door Adjustments
Once you've installed the cabinets and doors, your final adjustments might involve checking the door alignments, ensuring that handles or knobs are firmly in place, and that soft-close mechanisms are working correctly.
It's essential to take your time and pay attention to these details because they can greatly improve the functionality and aesthetics of your new kitchen. You're almost there!
For more detailed guidance on these final adjustments, feel free to reference these helpful links:
- Guide to Aligning Kitchen Cabinet Doors
- Attaching Handles or Knobs Securely
- Checking and Correcting Soft-Close Mechanisms
Remember, the devil is in the details. Perfecting these minor adjustments will give your kitchen a professionally finished look!
6. Measuring and Installing Worktops or Countertops
When designing your dream kitchen, the worktops or sometimes called countertops play an important role. They act as a focal point tying together all the other elements in your kitchen.
More importantly, they serve as your primary workspace for food preparation. Therefore, getting accurate measurements for your countertops and installing them correctly is paramount.
Let's delve into how you can successfully carry out this task.
(6.a) Measuring your Countertops
Begin by taking detailed measurements of your kitchen. This involves measuring the length, width, and depth of each section.
This ensures that your countertop fits perfectly into your kitchen layout. Here's a step-by-step guideline:
- Determine the area: Identify every section that will need a countertop including the space around the sink, stove, and other appliances.
- Measure the length: Measure the length from edge to edge of each section using a measuring tape. Remember to include any overhangs.
- Measure the depth: Typically, kitchen countertops have a standard depth of 600mm, which includes a 20mm overhang past the door fronts. However, it is advisable to double-check this measurement.
- Take down the measurements: Write down each measurement as you go along. Make sure to label each section clearly for future reference.
For more specific help on measuring, check out our detailed guide on How to Measure Your Countertops.
(6.b) Installing your Countertops
Once you have your measurements, the next step is installing the countertops.
This might seem daunting, but with the right tools and a bit of patience, you can install them yourself.
- Prepare your workspace: Make sure that the cabinets are properly levelled and secured. Clear any debris on the cabinet surface where the countertop will be set.
- Set up the countertop: Carefully position the countertop onto the cabinets. Make sure it is lined up correctly, and there is an even overhang on all sides.
- Secure the countertop: Once you're satisfied with the positioning, secure the countertop with screws from the underneath of the cabinets.
- Seal the gaps: Use caulk to seal any gaps between the countertop and the wall.
For additional information on installing countertops, refer to our article, Installation Guide for Your Countertops.
Always remember, precision is key.
Take your time and double-check everything.
To sum it up, accurately measuring your countertops and installing them correctly contributes significantly to the functionality and aesthetics of your kitchen.
Take the time to get it right, and you'll be well on your way to enjoying your dream kitchen.
7. Installing the Sink and Tap
Whether you're replacing an old kitchen sink or fitting a new sink in an entirely new kitchen, the process remains the same.
Follow along as we make short work of installing a kitchen sink and tap.
It may seem challenging, but broken down into simple steps, it becomes a manageable task, even for an ambitious DIY'er. Let's begin:
Step 1: Preparing for Installation
Begin by shutting off the water supply to avoid any unexpected showers.
This is usually found beneath the sink or at your home's main water supply point.
Step 2: Removing the Old Sink
Prior to installing the new sink, you'll need to detach the old one.
Start by disconnecting the water supply lines and the drain pipe, then loosen the clips holding the sink in place and carefully lift it off.
Remember to protect your work area to prevent any damage.
Step 3: Setting Up the New Sink
After the old sink has been removed, clean the area and confirm that your new sink fits properly.
Apply a thin line of silicone sealant around the edge of the sink’s hole, place the sink in position and secure it with mounting clips.
Step 4: Attaching the Tap
Now that your sink is in place, attach your Tap according to its specific instructions (these should be included in the packaging). Once done, connect the supply lines back to the water supply.
Step 5: Connecting the Drain
Last but not least, connect your drain back by attaching the P-trap to the tailpiece. Make sure all connections are tight.
Disclaimer: While these instructions work for most setups, your home might have specific needs due to its unique plumbing configuration. It's always wise to consult a professional before proceeding with installation if you’re unsure.
For detailed information on this topic, follow our guides on how to install a sink and how to install a tap.
8. Installing and Connecting Appliances
Now that your kitchen is taking shape, it's time to focus on installing and connecting your appliances.
This critical step ensures that your kitchen is not just aesthetically pleasing but also fully functional.
You'll be dealing with refrigerator, cooker, dishwasher, and other electronics which may necessitate dealing with both electrical and plumbing connections.
If handled improperly, this could lead to serious issues down the line.
Remember: Safety is paramount. Always make sure to disconnect any electrical or gas supplies before starting. It's better to be safe than sorry.
Step 1: Check the Positioning of Appliances
Plan where each appliance should go based on convenience and the existing connections for power and water.
You may need to consider your kitchen layout before moving any bulky appliances into place.
Step 2: Installing the Appliances
- Cooker: For electric cookers, simply plug into the socket. Gas cookers, however, need to be set up by a registered gas engineer.
- Refrigerator: Place your refrigerator in its desired location and plug it into a socket. Remember to give it a couple of hours before stocking it with food.
- Dishwasher/Washing Machine: These need both an electricity supply and a water connection. If you feel unsure about these, you can always check our guide for installing washing machines and dishwashers.
Step 3: Final Check
After you've installed and connected all your appliances, make sure to test them to ensure they're working properly.
It's easier to address any issues now than after everything has been fitted into place.
This is just the basics of appliance installation in your kitchen project.
Always consult the manufacturer's guide for specific instructions regarding individual appliances.
9. Electrical and Plumbing Considerations
Installing a new kitchen is a multifaceted task that needs detailed planning and a comprehensive understanding of various factors.
Perhaps, the most critical components come in the form of your kitchen's electrical and plumbing systems.
Before you get started with the installation process, it's essential to take your electrical and plumbing systems into account.
They are the heart and circulatory system of your kitchen – without them, the kitchen will not function correctly.
Kitchen Electrics & Electrical Amendments
Take time to plan where your outlets will go. Take into account the locations of your appliances, such as your dishwasher, fridge, and cooker.
Also, consider where you might want extra outlets for small appliances.
It's recommended that you hire a professional electrician for this process, as they can provide expert advice and help prevent any potential hazards.
For further instruction, check out our detailed guide on electrical amendments for kitchen installations.
Plumbing Considerations
Similar to kitchen electrics, plumbing also requires careful attention.
You need to know where your water supply and waste lines will be. You need to consider the location of your sink, dishwasher, and if included, the washing machine.
These will determine where the pipes should go. It's advisable to solicit the help of a professional plumber for these tasks.
For extensive instruction, you can refer to our complete guide on plumbing considerations in kitchen installations.
Note: Always remember, safety comes first. While going the DIY route might save you some money, certain tasks, particularly involving plumbing and electrics, should be left to the professionals. You don't want to risk damaging your property or worse, causing injury to yourself.
10. Install Kitchen Splashbacks or Wall Tiles
Having installed your cabinets and worktops, the next stop in our kitchen installation journey is the backsplash and wall tiles.
Often seen as purely decorative, the backsplash serves a vital purpose in protecting your walls from splashes, spills, and stains.
Plus, the right choice can truly elevate the overall look of your kitchen.
Choosing Your Backsplash and Wall Tiles
Before you start installing, it's essential to choose the right type and style of tiles for your kitchen.
These days you can find tiles in a variety of materials: ceramic, glass, stone, metal, and more. Consider your kitchen's style and the practicality of each material.
For instance, ceramic and glass are easy to clean, while stone and metal may require special care.
Additionally, the size and shape of the tiles can dramatically change the feel of the space.
Subway style tiles lend a clean, modern look, whereas intricate mosaic tiles can create a sense of old-world charm.
The Installation Process
Once you've chosen your tiles, it's time to get down to business. Here is a step-by-step guide for installing your backsplash and wall tiles:
- Prepare the wall: Make sure the wall is clean, dry, and smooth. Any bumps or irregularities can cause problems during installation.
- Create your layout: Use a chalk line or level to mark where the tiles will go. This will help ensure straight, even installation.
- Apply the adhesive: Using a notched trowel, spread tile adhesive onto the wall. Only cover a small area at a time to prevent the adhesive from drying before you can set your tiles.
- Set the tiles: Press the tiles firmly into the adhesive. Use tile spacers to ensure even spacing between tiles.
- Apply grout: Once the adhesive has set (usually after 24 hours), remove the spacers and apply grout with a rubber float, pressing it firmly into the gaps between tiles.
- Clean up: Use a damp sponge to remove any excess grout, being careful not to wipe out the grout lines.
- Seal the grout: After the grout has fully dried, apply a grout sealer to protect it from moisture and staining.
Remember: Patience is key when installing tiles. Take your time to ensure a neat and precise installation. Occasionally step back and check your work from a distance to spot any misalignments.
With these steps, you should be well-prepared to install your kitchen walls and backsplash tiles.
However, if you'd like further information and troubleshooting advice, please refer to our detailed guides on backsplash installation and wall tile installation.
11. Installing Kitchen Flooring
After you have achieved the perfect kitchen setup, the next step in the process is installing the flooring.
The flooring will not only set the aesthetic tone but also withstand the wear and tear inherent in a busy kitchen.
The Choice of Flooring
Start by selecting the type of flooring that will best meet your needs. Popular options include hardwood, tile, laminate, and vinyl – each with its unique pros and cons.
Material choice largely depends on your budget, kitchen use and desired aesthetic appeal.
Remember: Patience is key when installing tiles. Take your time to ensure a neat and precise installation. Occasionally step back and check your work from a distance to spot any misalignments.
Preparation
Before you start to install your chosen flooring, ensure your subfloor is clean, flat, dry, and structurally sound. Remove any old flooring, repair any damages and vacuum any debris.
Tip: This step is essential to ensure that your new flooring fits well and lasts longer.
Installation Process
The method of installation will depend on the type of floor you've selected:
- Hardwood - Glue, clip or nail down depending on the type of hardwood flooring.
- Tile - Use a thinset mortar, spacing, and grout.
- Laminate - Snap and lock into place, usually no adhesion needed.
- Vinyl - Glue down, lock into place, or loose lay depending on the form of vinyl selected.
Finishing
Once you’ve installed your kitchen flooring, the last step is to add your baseboards and mouldings back around the perimeter of the room.
This not only gives your kitchen a more professional, finished look, but it also helps to seal out any moisture and dust from underneath the flooring.
To learn more about each installation method and the best practices, check the resources provided below:
12. Adding Finishing Touches, Lighting and Décor
Adding finishing touches to your kitchen is not about just making it look attractive, but also increasing the functionality.
This is the stage where your kitchen truly comes to life and starts to take on your own personal style.
Firstly, let's tackle the hardware, such as cabinet handles and drawer pulls.
It's not only a decorative element, but also enhances usability of the cabinetry that you've installed.
There's a wide variety of styles and finishes available, so be sure to choose something that complements the overall theme of your kitchen.
- Round or square? Hard angles can offer a modern look, while softer shapes suggest a more traditional style.
- Would you like a finish that stands out, like stainless steel or brushed nickel? Or would you prefer something more subtle, such as oil-rubbed bronze?
Once these questions are answered, you can start the process of installing the hardware.
Lighting
Secondly, the right lighting in your kitchen can make a huge difference. Using a mix of ambient, task, and accent lighting can both enhance the features of your kitchen and provide an ideal workspace.
- Ambient lighting: This is the main source of light in the room, typically from ceiling fixtures or recessed lighting.
- Task lighting: This is separate, additional lighting provided for work areas like countertops and stovetops. These could be in the form of under-cabinet lights or pendant lights.
- Accent lighting: This is for decorative purposes and to highlight kitchen features - like glass-front cabinets or a tile backsplash.
You can refer to this lighting guide for tips on where to place each type of lighting.
"Remember, the goal is to create a warm, inviting space that you love spending time in."
Décor
Finally, the most personal touch, décor. Infuse your personal style into the kitchen through the use of rugs, wall art, window treatments, and/or plants.
Remember to coordinate these with the colour palette of the room to create a cohesive style.
Don't forget, the finishing touches matter just as much as the initial installation.
They can make or break the entire look and feel of your kitchen.
Take your time, explore different options and allow your kitchen to reflect your personality and fulfil your domestic needs effortlessly.
13. Common Mistakes to Avoid
When it comes to installing a kitchen, it's essential to ensure that you take care not to make any common mistakes.
These could affect the quality of the results, and in turn, your enjoyment of your kitchen space. Remember, avoiding these pitfalls can save you both time and money!
Here are some usual errors DIY'ers tend to make in this process:
- Not Planning Properly: A good plan is half the job done. This is particularly important when it comes to the layout. When planning, consider who will be using the kitchen and how they will use it. Create a clear roadmap before starting work. For a deeper insight into this, refer to our detailed article 'A Comprehensive Guide to Kitchen Planning'.
- Misjudging Dimensions: Incorrect measurements can lead to improper installation of kitchen units and appliances. Always double-check your measurements to avoid any discrepancy. Visit our webpage 'Avoiding Measurement Mishaps: A DIY Guide' to understand this better.
- Overlooking Ventilation: Proper ventilation is essential for any kitchen to remove odours and reduce humidity. Don't forget to plan for an effective ventilation system. Our 'Ventilation Essentials for Your Kitchen' page can provide you with more information.
These are just a few of the common mistakes, there can be more snags that can derail your kitchen installation project. It's always wise to read and learn from other's experiences.
"Knowledge is learning from your mistakes, wisdom is learning from mistakes of others."
Sticking to thorough planning, proper measurements, and consideration of essential features like ventilation can pave the way for a smooth kitchen installation process.
14. Budgeting and Cost Considerations
Creating your dream kitchen requires careful planning, especially when it comes to budgeting.
It is critical to understand the various costs involved in installing a kitchen and prepare accordingly.
This part of the guide will walk you through some key cost considerations to ensure your kitchen project stays within budget.
"A well-planned budget is the first step to a well-planned kitchen."
Most kitchen installation budgets consist of a few common elements. Here are the key cost factors:
- Materials: These account for a major part of your budget. Everything from cabinets, worktops, tiles, to appliances fall under this category. It's essential to allocate a substantial portion of your budget for materials. You can view a detailed list here.
- Labour: If you're not going the DIY route, you'll need to factor in labour costs. Many professionals such as plumbers, electricians, and builders may be necessary. More complex projects will naturally lead to higher labour costs.
- Unforeseen expenses: Often, there are hidden issues that only become apparent during the installation. These might include necessary electrical upgrades or unseen structural issues. It's prudent to keep aside about 10-15% of your budget for such unforeseen expenses.
Creating Your Budget
Once you understand the potential costs involved, it's time to create your budget. Here are basic steps for budgeting your kitchen installation:
- Inventory your needs and wants. Make a list of priorities.
- Get quotes from multiple suppliers and professionals to understand the market rates.
- Set your budget limit based on what you can afford to spend. Sort your priorities into this budget.
- Always keep a contingency plan for unexpected expenses.
With a well-considered budget, you will be primed for a successful kitchen installation. Remember, what you invest in your kitchen now will ultimately add to the value of your home.
So, plan wisely and get set to create your dream kitchen!
15. Safety Tips and Precautions
Before we delve into the step-by-step process of installing your kitchen, it's important to consider some indispensable safety tips and precautions.
The installation of a kitchen involves multiple tasks that require the handling of power tools, delicate materials and sometimes, electricity.
Hence, safety should be your prime concern.
Safety Gear
First and foremost, you need to equip yourself with adequate safety gear. The following are essential items:
- Goggles: These will protect your eyes from dust, debris or any fragmented materials.
- Gloves: Protective gloves can prevent cuts and scratches while handling rough and sharp materials.
- Safety shoes: A pair of steel-toed shoes can prevent injuries from accidental falls of heavy kitchen equipment.
- Wear proper clothing: Avoid loose clothes that might get caught up in power tools.
Power Tool Safety
Many kitchen installations involve the use of power tools, and improper usage can lead to accidents. Here are some precautions:
- Read the user-manual thoroughly for every tool you use.
- Always unplug power tools when not in use or while changing attachments.
- Ensure your work area is well-lit and free from clutter and obstacles.
Take a look at our Power Tool Safety Guide for a complete overview.
Remember, no kitchen installation is so urgent that safety procedures should be forsaken. The key to a successful DIY project is patience and diligence, with a commitment to doing things right.
16. Comprehensive Glossary of Essential Kitchen Installation Terms
Feel free to Navigating the world of kitchen installations can be a bit daunting especially when faced with technical jargon.
If you find yourself scratching your head, not knowing your worktop from your plinth or your cornice from your pelmet, worry not.
We've compiled a separate help page to help demystify these terms for you.
The Kitchen Glossary is a straightforward resource providing clear definitions for many of the terms you'll encounter.
It's aimed at helping you understand the lingo, making your kitchen installation journey a bit smoother.
check out the Glossary of Kitchen Related Terms for a clearer understanding of essential terms.
17. Your Next Steps in the Kitchen Installation
Undertaking to install a new kitchen can appear daunting at first, especially for DIY enthusiasts.
However, with a proper plan, the right tools and a step-by-step approach, what could seem overwhelming turns into an engaging and rewarding project.
This comprehensive guide aims to provide you, the keen DIY'er, with all the information you need to successfully install a kitchen.
"Proper preparation prevents poor performance." - William Arthur Ward
In this context, this refers to the sense of accomplishment from transforming the heart of your home with your own hands while saving a significant amount on labour costs.
Each section in this guide presents a key phase of the installation process, starting with planning your ideal kitchen design and ending with those final touches that make your kitchen uniquely yours.
- Planning and Designing Your Kitchen Layout: This section assists you to design your kitchen layout, ensuring it complements your lifestyle and home's flow.
- Gathering the Necessary Tools and Materials: Incorrect or missing tools can halt progress. We guide you on the essential tools and materials you need before starting.
- Preparing the Workspace: Learn how to adequately prepare your workspace, ensuring an efficient and safe working environment.
- Installing Kitchen Components: This part takes you through the process of installing cabinets, countertops, the sink, tap, and appliances.
- Handling Electrical and Plumbing: An introduction to the technical aspects of kitchen installation.
- Adding Finishing Touches and Décor: This section explores how you can personalise your space.
- Budgeting and Cost Considerations: Practical advice on managing project expenses.
- Safety Tips and Precautions: Essential safety guidelines to ensure your kitchen installation goes smoothly and safely.
By following this go-to manual, we trust that you will complete a successful kitchen installation, enhancing both your home's character and its value.
But remember, you're not in this alone. If you get stuck, don't hesitate to seek help from professionals. Sometimes, an extra pair of expert hands can make all the difference.
Remember, installing a kitchen is not just a project - it's also an investment in your home. So don't gamble with your time and resources – get help if you need it.
We're only a phone call or email away.
Reach out to us for any queries or assistance, and our experienced team will be there to guide you every step of the way.
You've embarked on an exciting journey. We're here to help you ensure it's also a gratifying one.
Happy DIYing